Promoting Early Science Education with Hands On Discovery
  • About
  • Join
  • Videos
  • Birthday Parties
  • Experiments
    • NEW!! Static Electricity
    • "See" Sound Travel
    • Balancing Forks
    • Sink or Float?
    • Lava Lamp
    • Frost and Dew
  • Blog
  • Press

How are Sedimentary Rocks Formed?

5/31/2013

3 Comments

 
Sedimentary rocks
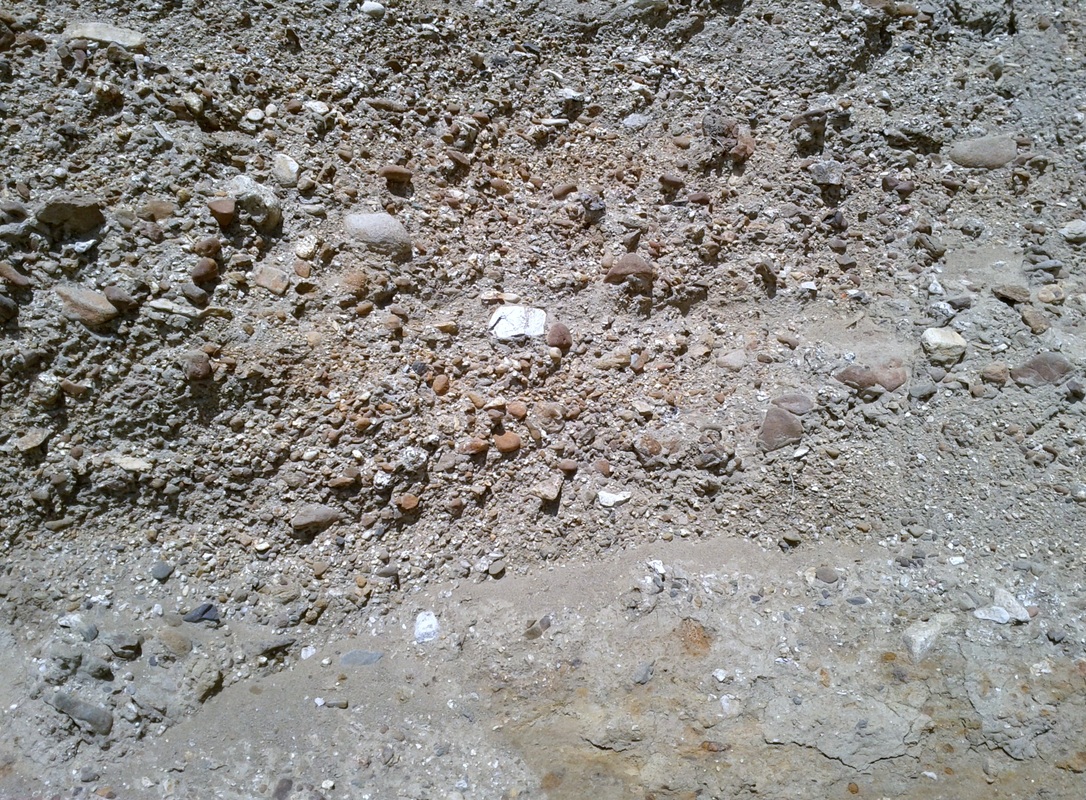
Backdrop of Sedimentary rock formation
It was Mother's Day and we were at Half Moon Bay. We were just wrapping up a great day by the Ocean, when I noticed this awesome Sedimentary rock formation. Of course, I could not pass up the opportunity to impart a little scientific knowledge!  

I started to explain that when mountains are first formed, they are tall and jagged like the Rocky Mountains on the west coast of North America. Over time (millions of years) mountains become old mountains like the Appalachian Mountains on the east coast of Canada and the United States. 

Old mountains are rounded and lower. The rocks erode or get eaten away by natural elements like rain, wind, freeze/thaw cycle and stream or rivers flowing down cause the big mountains to crumble slowly. 

These crumbled or battered rock pieces or "sediments,"  land in the streams and rivers that flow down from the mountains. They settle down on the bottom of the lake or oceans they run into. Over time, layers of different rocks settle at the bottom of lakes and oceans. This sediment compresses over a long period of time and consolidates into solid layers of rock. These layers are called strata. 

Some examples of sedimentary rocks are sandstone and shale. The pictures below are sandstone formation. Though it is hard to tell in the picture above, this formation was actually reddish in color and sandy; some of the stones actually broke apart easily. Notice the second slide; the layer of rock underneath is a different color (black spots) than the rock layer on top. 

There are 6 main kinds of sedimentary rocks. Sedimentary rocks take years and years to form, but you can make your own in days! Click the link below to make your own Sandstone. What are Sedimentary rocks?  

Cool Facts!
Sedimentary rocks cover 75% of the earth’s surface. Most of the rocks found on the Earth’s surface is sedimentary even though sedimentary rocks only make up less than 5% of all the rocks that make up Earth.

3 Comments

Mother's Day Science Fun : Bring the Spa Home to Mom

5/12/2013

0 Comments

 
PictureExotic Sandalwood Spa Salts
I was looking for a fun experiment to do with my girls, and I wanted to stir up a luxurious potion that all three of us could use, without worrying about skin-irritating chemicals.

I have become a big fan of Epsom Salts lately. Seems like I am creaking in more places than I ever did before! Epsom Salts or Magnesium Sulphate, is a great stress-buster and pain reliever and is effective in treating sore muscles. Plus, it also softens your skin, especially calluses. I made an Epsom salts soak for my daughter when she complained of intense pain in her legs after her ballet class. She was amazed at the instant relief she got. 

I thought it would be a great idea to bring the spa to Mom on Mother's Day-- and what better way than to have Mom and kids to stir up a delicious smelling batch of Bath Salts? Plus, we can sneak in a bit of science! 

Ingredients:
3 cups Epsom Salts
1 1/2 cups Sea Salt
2 tablespoons sandalwood powder (We used this in place of essential oils) or your favorite essential oils
Fresh rose petals
Airtight Jar
Mixing bowl
Spoon

Method: 
1. Mix the Epsom salts and sea salt together in the bowl. 
2. Mix well with a spoon.
3. Tear/chop up the rose petals into tiny pieces and add.
4. Add 2 tablespoons of sandalwood powder. If you use essential oils, mix well to ensure no clumps are formed.
5. Store in an airtight jar. 
6. Now grab your favorite book and indulge yourself in a warm, gorgeous-smelling spa soak. You've earned it! 
Happy Mother's Day!

You can try making different kinds of bath salts to suit your mood. 
Lavender: Soothing, pain reliever 
Chamomile: calming 
Calendulla: healing 
Peppermint: stimulating 
Lemon: refreshing  

So, what is the science behind the Bath salts?
Hard water has a high mineral content of usually calcium and magnesium, whereas soft water contains less of these minerals. Calcium and magnesium ions in the hard water react with soap, forming insoluble gray flakes or "soap scum" instead of a lather. You need more soap to get clean and the bathtub gets a grimy ring around it from the leftover soap scum. When you add bath salts, the calcium and magnesium ions in the water are replaced with sodium and potassium ions from the salt, allowing the soap to lather much more easily.

NOTE: If you already have soft water, you may not notice much of a difference in how well the soap lathers in the water with your bath salts and the water without the bath salts. However, the salt and essential oils will still have a beneficial effect on your skin.

Adding bath salts to your bath has to do with osmosis. Osmosis is the movement of water through a membrane (like your skin) to achieve equilibrium. Your body contains water and salt, whereas an ordinary bath contains mostly water and very little salt. So, water passes through your skin in an effort to balance the concentration of water and salt in you and in your bath. The excess water causes a "pruning" effect (your fingers and toes wrinkle). Adding bath salts to the water causes a more equal balance of salt and water in both you and your bath, so less water enters your skin and less "pruning" occurs. Salt is also draws toxins out of your skin and soothes sore muscles.
.

0 Comments

Do You Need Wings to FLY?

5/6/2013

1 Comment

 
Picture
Hog-nose airplane
"I want to fly." For as long as I can remember, my second-grader has been fascinated and obsessed with flying. As a 3-year-old, she desperately wanted to grow wings and was really upset to find out she could not really do that. I think it all started with Peter Pan. Since the first time she watched that movie, she's been dreaming of flying. It was a natural choice for her to choose Aerodynamics as a Science Fair project. 

We had a great time working on it together. She had done all her research; watched countless videos on on Youtube and picked up a library book at school that had instructions on how to make various paper airplanes. Her hypothesis was to determine  "if wings are needed in flight." 

She made the Hog-Nose, the Master, and the Lock-back Jackknife airplanes, plus a Hoop Glider. We went to the backyard to test out her hypothesis and flew them all. The Master lived up to its name. It flew 13'15".  When I had made the Hoop Glider earlier for a workshop, I was surprised to find that it actually "flew" pretty well. I did not measure the distance at the time, but we made an amazing discovery --The Hoop Glider flew 12'11" and came in a close second to the Master. The Lock-Back Jackknife did some pretty spectacular flips and went 9'11". The Hog-Nose came in last going 5'3 1/2". 

Next, my daughter wanted to test out "wingless" airplanes to see if wings were really needed to fly. She cut both the wings of the Master airplane and flew it. It did a sort of flip and collapsed after travelling a distance of 3' 8".

Observation:  Airplanes with wings flew; the Master airlplane with cut-of wings did not really fly.

Conclusion: Wings are needed to fly... unless you are in a hot air balloon, or you are an astronaut!


We used "The World's Greatest Toy Airplane and Toy Book," by Keith R. Laux.


1 Comment

    Raju Rajesh

    Project-based learning activities, snippets from Jr. Wacky Scientist workshops, updates on on our milestones, and more.

    Categories

    ALL

    Archives

    August 2013
    July 2013
    May 2013
    April 2013

    RSS Feed

Powered by Create your own unique website with customizable templates.