
Cruisin' Can
Cruisin' Can
We will build the Cruisin' Can, a new version of the old favorite, the Roller Racer.
We will simple machines and energy conversion. We will also discover and investigate changes in stored energy and their effect on a machine's performance.
Materials in the box
2 clear plastic lids hole-punched in the center, 1 corrugated golden cardboard sheet, 2 pony beads, one rubber band, 2 gem clips, 1 coffee stirrer, and 1 adhesive foam block, single sided.
How do I begin?
1. Interlock the two rubber bands as shown below. Pull the knot tight.
2. Insert the end of one of the rubber bands into and through each of the 2 beads until a small piece of rubber band sticks out. The two beads should lie next to each other.
3. Insert the straw through the small loop in the rubber band created by the two beads until about 1/10 of the straw is through the loop. Pull on the other end of the rubber band to tighten the loop around the straw so the straw lies next
to the beads.
4. Insert the free end of the rubber bands into the hole in the second lid starting from the top side of the lid (groove is on the bottom side). Pull the rubber band through until the last bead is snug against the lid. The two beads and the straw secured by the small piece of rubber band will sit on top of the lid.
5. Place the lid on a flat surface with the groove upward.
6. Insert the long edge of the single sided corrugated sheet into the groove of the lid, shaping the corrugated sheet to form a circle. Overlap the ends when the groove is filled.
7. Place the lid on a flat surface with the groove upward.
8. Insert the long edge of the single sided corrugated sheet into the groove of the lid, shaping the corrugated sheet to form a circle. Overlap the ends when the groove is filled.
9. Put the lid on the cardboard cylinder, fitting the cardboard edge into the lid. Hold the lid in place while pulling the rubber band up until the knot between the rubber bands, and the top of the second rubber band comes through
the lid. See figure 8. Insert the paperclip into the loop between the knot and the lid.
10. Remove the release paper from the piece of adhesive foam. Place the foam on the lid next to the paperclip. Keeping the paperclip parallel to the foam, press down on the foam to secure. The foam will keep the
paperclip from rotating when the straw on the other end is rotated.
11. Wrap the excess rubber band around the foam.
12. Hold the Roller Racer in both hands. Using the finger of one hand rotate the straw around the pivot point (above the beads) a set number of times (10 to 20).
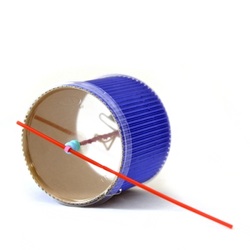
13. Being careful to keep the straw still, set the Roller Racer on a smooth surface, see figure 1. If the 2 beads have become tilted, move the straw so that the beads are at a right angle to the lid.
14. Aim the Roller Racer in a direction clear of obstacles and let go! Note the direction and distance of travel.
What just happened?
Turning the straw, which acts as a lever, will wind up the rubber band and store elastic potential energy. This energy is the result of the mechanical work done by a moving finger as it applies a force over a certain distance. When the rubber band is allowed to unwind, the potential energy (stored energy) is turned into kinetic energy (energy of motion), and a small amount of heat that is generated by the friction of the Roller Racer with the surface it touches, as well as the air it moves through.
Exploring Further
1. Vary the number of times the straw is rotated when winding the Cruisin' Can and measure the distance travelled. Plot results on a graph to show distance variations over trials; and distance versus number of winding-rotations. Data could also be collected on the times needed to travel a particular distance.
2. Make the Cruisin' Can stop within a set range of distances, staying on a fixed path for a fixed distance, rolling over an obstacle, hitting a target, traveling a curved path to a target, or finding a way to make the Cruisin' Can travel in a straighter path.
3. Make variations of this design using a pair of CDs as wheels. (A CD design can cover distances of over 30 m (100 feet) on a smooth, level surface!)
We will simple machines and energy conversion. We will also discover and investigate changes in stored energy and their effect on a machine's performance.
Materials in the box
2 clear plastic lids hole-punched in the center, 1 corrugated golden cardboard sheet, 2 pony beads, one rubber band, 2 gem clips, 1 coffee stirrer, and 1 adhesive foam block, single sided.
How do I begin?
1. Interlock the two rubber bands as shown below. Pull the knot tight.
2. Insert the end of one of the rubber bands into and through each of the 2 beads until a small piece of rubber band sticks out. The two beads should lie next to each other.
3. Insert the straw through the small loop in the rubber band created by the two beads until about 1/10 of the straw is through the loop. Pull on the other end of the rubber band to tighten the loop around the straw so the straw lies next
to the beads.
4. Insert the free end of the rubber bands into the hole in the second lid starting from the top side of the lid (groove is on the bottom side). Pull the rubber band through until the last bead is snug against the lid. The two beads and the straw secured by the small piece of rubber band will sit on top of the lid.
5. Place the lid on a flat surface with the groove upward.
6. Insert the long edge of the single sided corrugated sheet into the groove of the lid, shaping the corrugated sheet to form a circle. Overlap the ends when the groove is filled.
7. Place the lid on a flat surface with the groove upward.
8. Insert the long edge of the single sided corrugated sheet into the groove of the lid, shaping the corrugated sheet to form a circle. Overlap the ends when the groove is filled.
9. Put the lid on the cardboard cylinder, fitting the cardboard edge into the lid. Hold the lid in place while pulling the rubber band up until the knot between the rubber bands, and the top of the second rubber band comes through
the lid. See figure 8. Insert the paperclip into the loop between the knot and the lid.
10. Remove the release paper from the piece of adhesive foam. Place the foam on the lid next to the paperclip. Keeping the paperclip parallel to the foam, press down on the foam to secure. The foam will keep the
paperclip from rotating when the straw on the other end is rotated.
11. Wrap the excess rubber band around the foam.
12. Hold the Roller Racer in both hands. Using the finger of one hand rotate the straw around the pivot point (above the beads) a set number of times (10 to 20).
13. Being careful to keep the straw still, set the Roller Racer on a smooth surface, see figure 1. If the 2 beads have become tilted, move the straw so that the beads are at a right angle to the lid.
14. Aim the Roller Racer in a direction clear of obstacles and let go! Note the direction and distance of travel.
What just happened?
Turning the straw, which acts as a lever, will wind up the rubber band and store elastic potential energy. This energy is the result of the mechanical work done by a moving finger as it applies a force over a certain distance. When the rubber band is allowed to unwind, the potential energy (stored energy) is turned into kinetic energy (energy of motion), and a small amount of heat that is generated by the friction of the Roller Racer with the surface it touches, as well as the air it moves through.
Exploring Further
1. Vary the number of times the straw is rotated when winding the Cruisin' Can and measure the distance travelled. Plot results on a graph to show distance variations over trials; and distance versus number of winding-rotations. Data could also be collected on the times needed to travel a particular distance.
2. Make the Cruisin' Can stop within a set range of distances, staying on a fixed path for a fixed distance, rolling over an obstacle, hitting a target, traveling a curved path to a target, or finding a way to make the Cruisin' Can travel in a straighter path.
3. Make variations of this design using a pair of CDs as wheels. (A CD design can cover distances of over 30 m (100 feet) on a smooth, level surface!)
