How Does a Glider / Plane Fly?
Materials in the box
1. Two bendy plastic drinking straws
2. Two 3 X 5 inch index cards
3. Scotch Tape
Materials from your house
1. Scissors
How do I begin?
1. Cut one index card into 3 separate strips measuring 1 inch x 5 inches
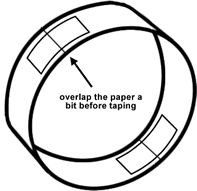
2. Take the two 1" x 5 " strips of paper and tape them together to form a hoop /circle. Ensure that you overlap the pieces about half an inch so that they maintain a nice circular shape, once taped.
3. Use the third strip of paper to make a smaller hoop, overlapping the edges about half an inch like before.
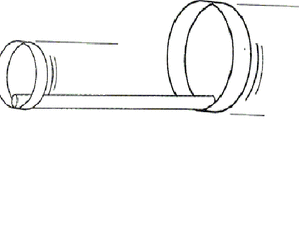
4. Tape the paper loops to the ends of one of the straws provided, ensuring that the straw is placed on the inside of the loops.
5. Ta da! Hold the straw in the middle with the hoops on either sides and throw it in the air like you would throw a dart-- tilted upwards slightly. With a little practice your amazing hoop glider can travel farther than many paper airplanes!
What just happened?
Call it weird looking, but you will find that your amazing hoop glider flies pretty well. The two varying sizes of hoops help to keep the straw balanced as it flies. The big hoop creates "drag" (or air resistance) which helps keep the straw level, while the smaller hoop at the front keeps your amazing hoop glider from turning off course. Contrary to popular belief, the hoop glider does not turn over because the hoops are heavier than the straw. Since objects of different weight generally fall at the same speed, the hoop will keep its "upright" position. Let us know how far you were able to get the hoop glider to fly by submitting it to our Facebook page.
Exploring Further
1. Does the position of the hoops on the straw affect the flight distance?
2. Does the length of straw affect the flight? (You can cut the straw or attach both straws provided, to test this)
3. Are three hoops better than two? Find out if more hoops mean smoother flight or not.
4. Do the hoops have to be lined up in order for the plane to fly well?

Big hoop.

Final assembly

